Getting Started#
Installation#
pip install leapp
LEAPP requires Python 3.8+ and PyTorch 2.6.0+. The full dependency list is available in LEAPP’s pyproject.toml.
Welcome to LEAPP! This guide walks you through the basics of using LEAPP to trace and export computational graphs from PyTorch code.
You’ll learn how to:
Use traced tensors to annotate node inputs and outputs
Build multi-node graphs by connecting one node’s outputs to a later node’s inputs
Understand where LEAPP writes models, YAML, and graph visualizations
Use
method()as a shorthand for simple, self-contained functions
Example: a robot sensor pipeline#
This pipeline preprocesses robot observations into a feature vector, then runs a small policy stage on those features.
import torch
import leapp
from leapp import annotate

_POS_MEAN = torch.zeros(6)
_POS_STD = torch.ones(6) * 0.5
_VEL_SCALE = 4.0
_ACTION_SCALE = 0.25
_JOINT_LIMIT = 1.0

def normalize_joints(pos: torch.Tensor, vel: torch.Tensor):
    pos_norm = (pos - _POS_MEAN) / (_POS_STD + 1e-6)
    vel_norm = vel / _VEL_SCALE
    return pos_norm, vel_norm

def capture_joint_observations(joint_pos, joint_vel):
    return annotate.input_tensors("obs_processor", {
        "joint_pos": joint_pos,
        "joint_vel": joint_vel,
    })

def capture_context(orientation, cmd_vel):
    return annotate.input_tensors("obs_processor", {
        "orientation": orientation,
        "cmd_vel": cmd_vel,
    })

def project_gravity(quat: torch.Tensor) -> torch.Tensor:
    w, x, y, z = quat[0], quat[1], quat[2], quat[3]
    return torch.stack([
        2.0 * (x * z - w * y),
        2.0 * (y * z + w * x),
        1.0 - 2.0 * (x * x + y * y),
    ])

def scale_and_clip(raw: torch.Tensor) -> torch.Tensor:
    return torch.clamp(raw * _ACTION_SCALE,
                       min=-_JOINT_LIMIT, max=_JOINT_LIMIT)

torch.manual_seed(42)
_W = torch.randn(18, 6) * 0.05
_b = torch.zeros(6)

def main():
    joint_pos = torch.randn(6)
    joint_vel = torch.randn(6)
    orientation = torch.tensor([1.0, 0.0, 0.0, 0.0])
    cmd_vel = torch.tensor([0.5, 0.0, 0.1])

    leapp.start(name="sample_pipeline")

    # NODE 1: observation preprocessing.
    # Multiple input_tensors() calls can contribute to the same node.
    pos, vel = capture_joint_observations(joint_pos, joint_vel)
    quat, cmd = capture_context(orientation, cmd_vel)

    pos_norm, vel_norm = normalize_joints(pos, vel)
    gravity_vec = project_gravity(quat)
    obs_features = torch.cat([pos_norm, vel_norm, gravity_vec, cmd])

    annotate.output_tensors(
        "obs_processor",
        {"obs_features": obs_features},
        export_with="jit",
    )

    # NODE 2: policy.
    feat = annotate.input_tensors("policy",
                                  {"obs_features": obs_features})
    raw_action = feat @ _W + _b
    joint_targets = scale_and_clip(raw_action)

    annotate.output_tensors(
        "policy",
        {"joint_targets": joint_targets},
        export_with="jit",
    )

    leapp.stop()
    leapp.compile_graph()

if __name__ == "__main__":
    main()
Understanding the example#
Traced tensors#
input_tensors() and
output_tensors() are the backbone of LEAPP tracing.
sensor_input = annotate.input_tensors('feature_extractor', {
    'sensor_data': clean_data,
})

# Operations on TracedTensors are recorded -- even through function calls.
result = some_helper_function(sensor_input)
result = result * 2 + 1

annotate.output_tensors('feature_extractor', {
    'result': result,
}, export_with="jit")
This pair gives you the most flexible capture surface:
Spans function calls — operations through helper functions are automatically traced.
Inline operations — mix function calls with inline tensor ops.
Programmatic control — define nodes dynamically.
Distributed inputs — call
input_tensors()multiple times with the samenode_namebefore one finaloutput_tensors().
Function decorator#
method() is a shorthand for simple, self-contained
functions:
@annotate.method(export_with="jit", node_name="preprocess")
def preprocess(raw_readings):
    return torch.clamp(raw_readings, min=0.0, max=1.0)
Internally it uses the same traced-tensor machinery as
input_tensors() / output_tensors().
Use |
Use |
|---|---|
The node fits cleanly in one function |
Node logic spans helper functions or multiple call sites |
Function args and return values already define I/O well |
You want explicit control over input and output names |
You want to inject semantic data into the final configs |
Graph flow#
joint_pos, joint_vel, orientation, cmd_vel
                    |
             [obs_processor]
                    |
              obs_features
                    |
                [policy]
                    |
              joint_targets
Tracing lifecycle#
leapp.start(name="sample_pipeline")   # 1. start tracing

# ... your annotated pipeline ...     # 2. run annotated code

leapp.stop()                          # 3. stop tracing
leapp.compile_graph()                 # 4. compile and export
What LEAPP Produces#
After compile_graph() runs, LEAPP writes a directory containing deployable
artifacts and the metadata needed to wire them together.
Per-node TorchScript or ONNX artifacts containing traced compute, constants, and model weights.
A YAML graph description with node inputs, outputs, backends, tensor metadata, and graph connectivity.
Optional replay checks compare exported model outputs against the traced Python outputs.
Optional diagrams make the traced pipeline easier to inspect and discuss.
Try it yourself#
Run the maintained example:
python examples/getting_started.pyOpen the generated
sample_pipeline/directory.Inspect the files to see your exported pipeline.
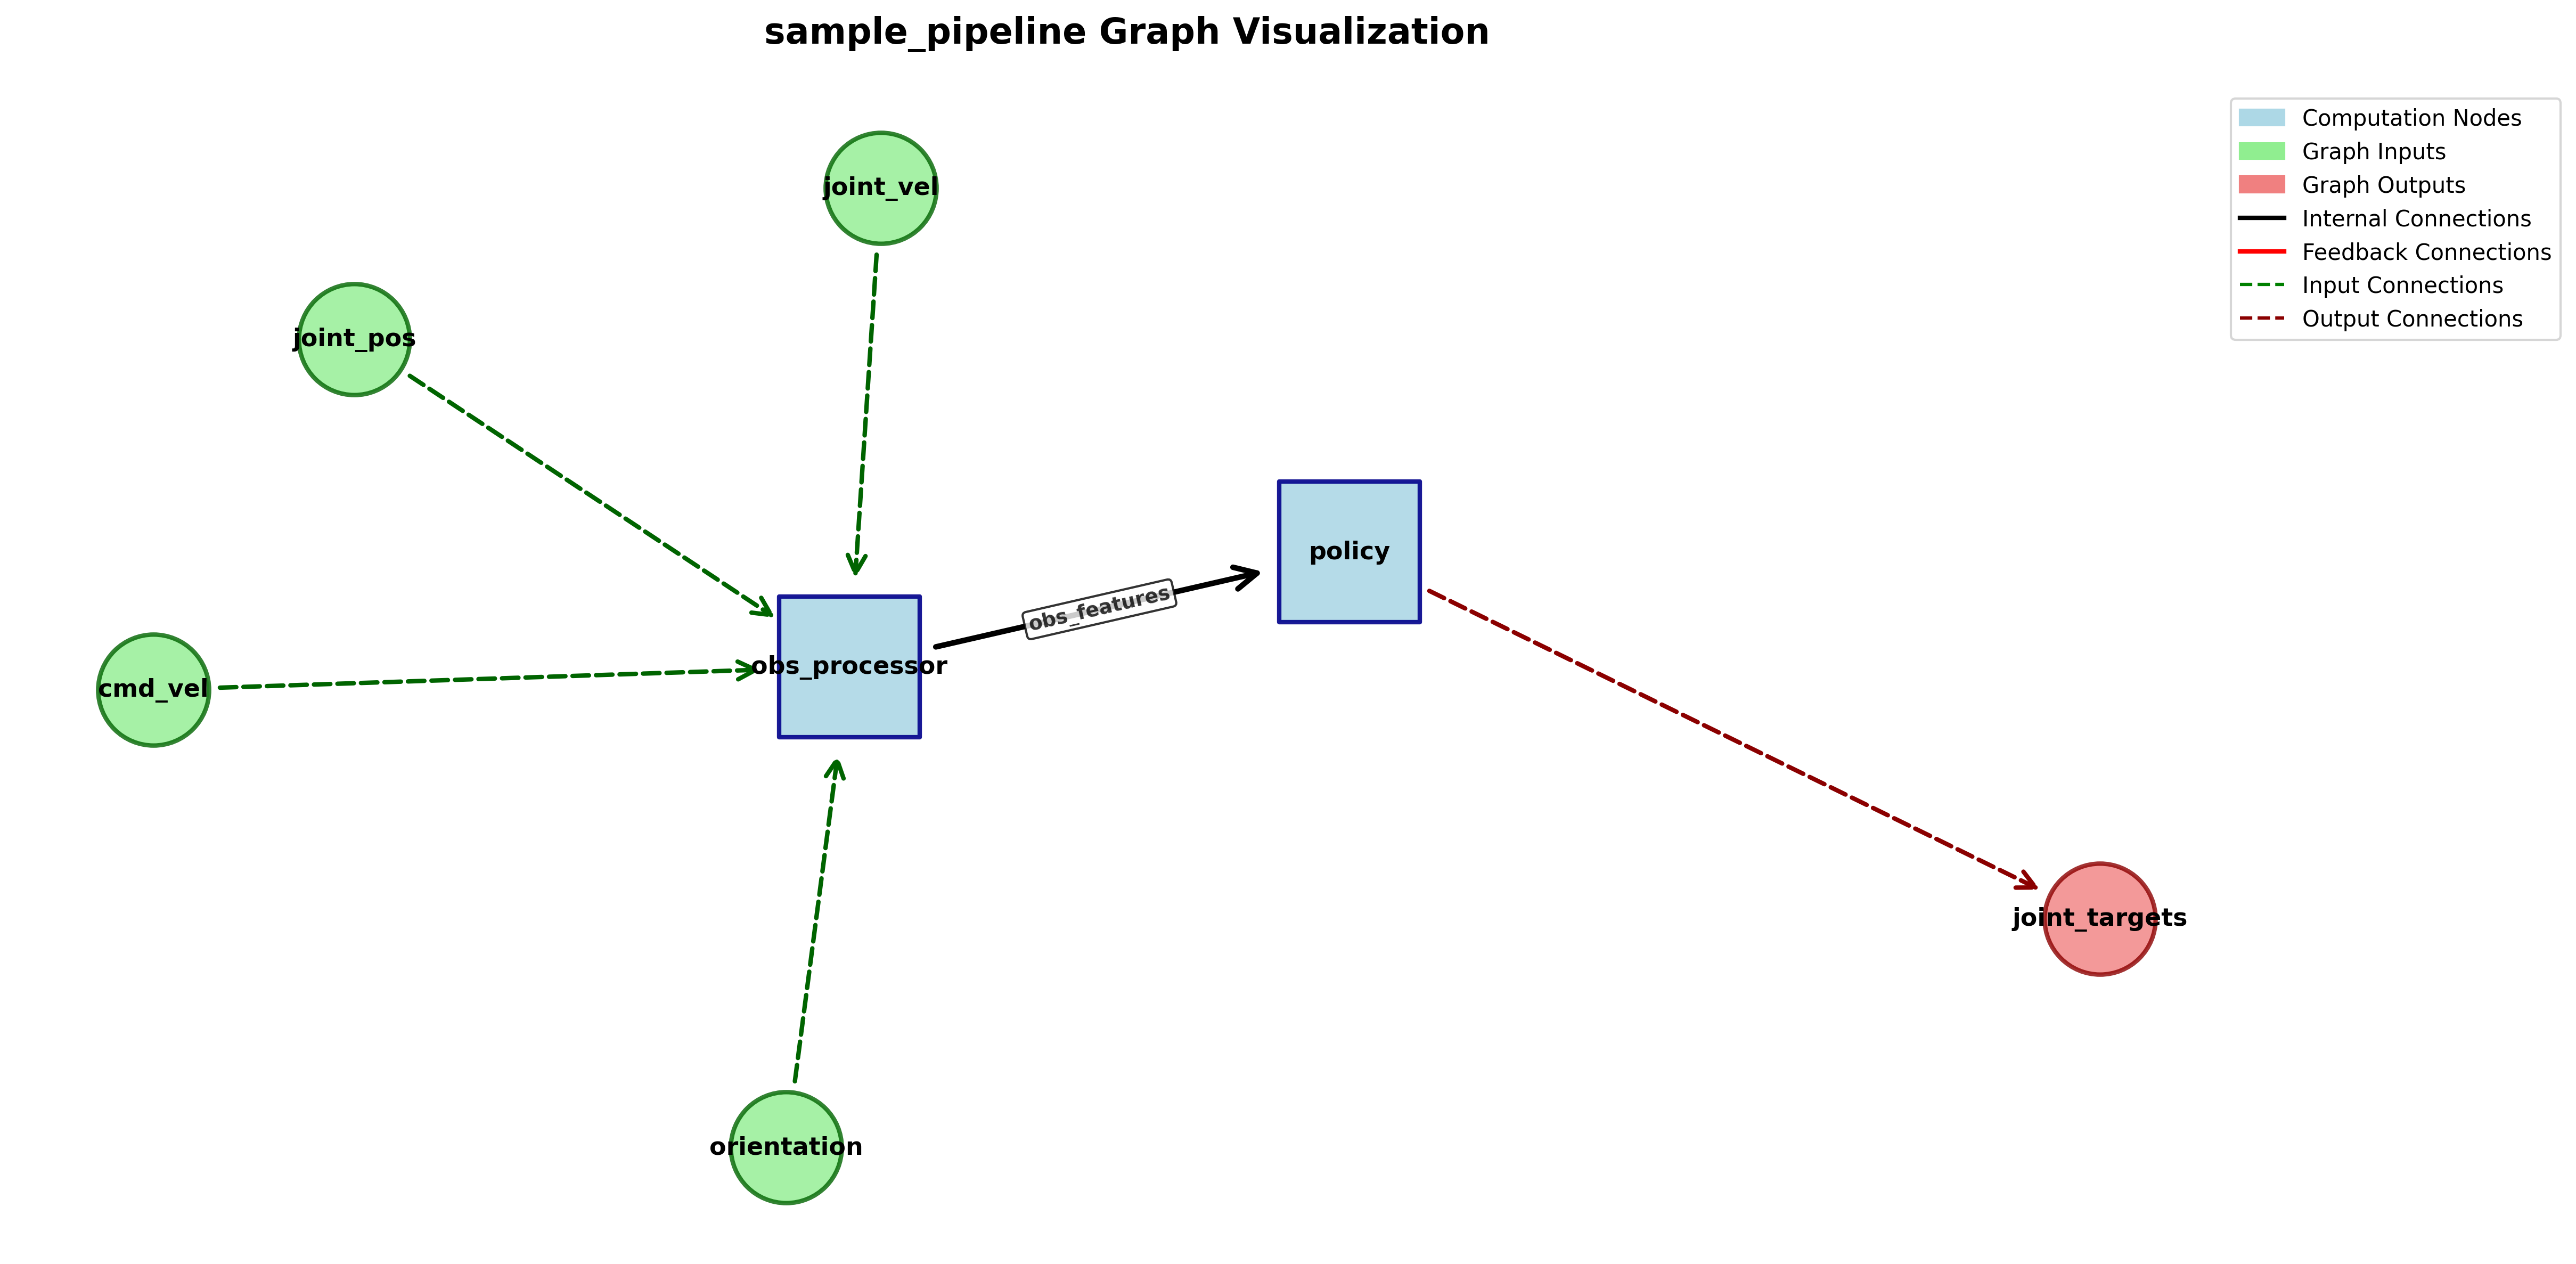
Graph visualization#
LEAPP writes a graph visualization showing exported nodes, graph inputs and outputs, and data-flow connections between nodes. Use it to verify that LEAPP detected the node boundaries and cross-node connections you intended.
Graph specification file#
LEAPP also generates a complete specification of the pipeline:
models:
  obs_processor:
    inputs:
    - dtype: float32
      name: joint_pos
      shape: [6]
      type: tensor
    outputs:
    - dtype: float32
      name: obs_features
      shape: [18]
      type: tensor
    parameters:
      backend: jit
      model_path: obs_processor.pt

pipeline:
  inputs:
    obs_processor: [joint_pos, joint_vel, orientation, cmd_vel]
  outputs:
    policy: [joint_targets]
  data_flow:
    obs_processor/obs_features: [policy/obs_features]
  feedback_flow: {}
This YAML contains:
Complete node specifications with input/output tensor descriptions.
Shape and dtype information for all tensors.
Graph structure metadata ready for deployment systems.
Export configuration showing how each node should be compiled.
Next steps#
Explore more complex pipelines in the
examples/directory of the source tree.Learn advanced features in Guides.
Browse the full API reference.