Deep Feature-based Reconstruction#
This example demonstrates how to integrate foundation-model features into an nvblox reconstruction.
Download an example SUN3D dataset by running the following command:
wget https://huggingface.co/datasets/nvidia/nvblox/resolve/main/sun3d-mit_76_studyroom-76-1studyroom2.tar.gz
tar -xvf sun3d-mit_76_studyroom-76-1studyroom2.tar.gz
Launch the example by running:
python3 -m nvblox_torch.examples.reconstruction.sun3d \
    --dataset_path <PATH>/sun3d-mit_76_studyroom-76-1studyroom2/ \
    --deep_feature_mapping
The code for this example can be found at sun3d.py
Note
This example consumes >10Gb GPU memory. On weaker GPUs, GPU memory might be exhausted, and the application may crash as a result.
Details#
The example is an extension of reconstruction example. See that example for details on the reconstruction pipeline.
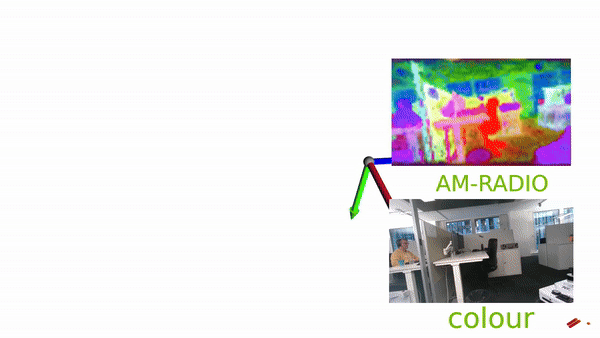
In this example we use AM-RADIO [1], an image foundation model to generate image features. First, we create an object to handle the generation of feature images.
feature_extractor = RadioFeatureExtractor()
Internally, this class loads the AM-RADIO model from torch.hub.
We then extract image features from an RGB image.
feature_frame = feature_extractor.compute(rgb=rgb)
nvblox_torch expects features to be of type float16 and contiguous in memory.
So we convert the features to this format and then add them to the reconstruction.
feature_frame = feature_frame.type(torch.float16).contiguous()
mapper.add_feature_frame(feature_frame, pose, intrinsics)
The features are stored in a FeatureLayer which is a VoxelLayer that stores a feature
for each voxel. To visualize the features we generate a FeatureMesh.
This is a mesh where each vertex stores a feature extracted from the voxel grid.
We generate the featurized mesh with:
mapper.update_feature_mesh()
feature_mesh = mapper.get_feature_mesh()
the resulting object feature_mesh stores vertices and per-vertex features on the GPU.
Each feature is a high-dimensional vector.
To turn this into a colorized mesh, which we need for visualization, we project
these to 3 dimensions, corresponding to the RGB channels, using PCA in the Visualizer.
visualizer.visualize(color_mesh=color_mesh, feature_mesh=feature_mesh, camera_pose=pose)
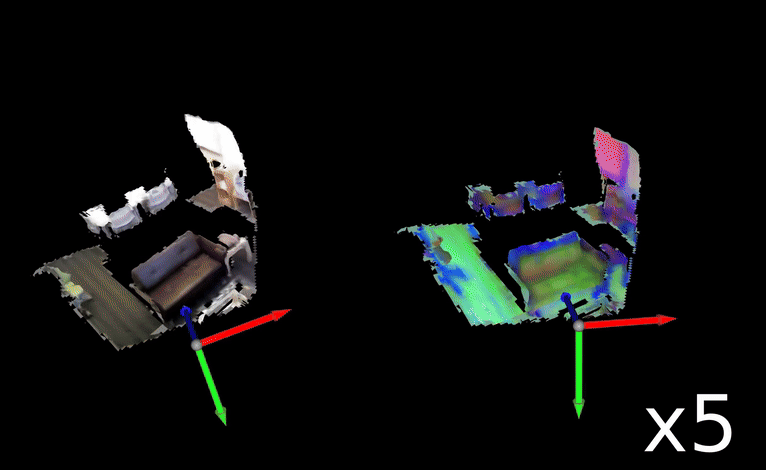
The results look like: