

G1 Demonstration Recording#
Record Unitree G1 demonstrations of moving an apple to a plate in simulation. Use Isaac Lab-Arena with Pink inverse kinematics (IK) and AGILE locomotion control for the complete path through optional AutoData generation, GR00T training, and evaluation.
To see a similar workflow with the Unitree H2 Plus, see Demonstration Recording in the H2 workflow.
Tip
Start conversion with a generated HDF5 download. LeRobot datasets and trained models are available in the G1 policy training and G1 policy evaluation steps.
Prerequisites#
Complete Installation and G1 simulation on the recording workstation.
Complete the XR recording requirements and have the headset ready.
Run the commands below from this repository’s root. Use a new output filename for each recording session and keep the original files.
Task and Successful Demonstrations#
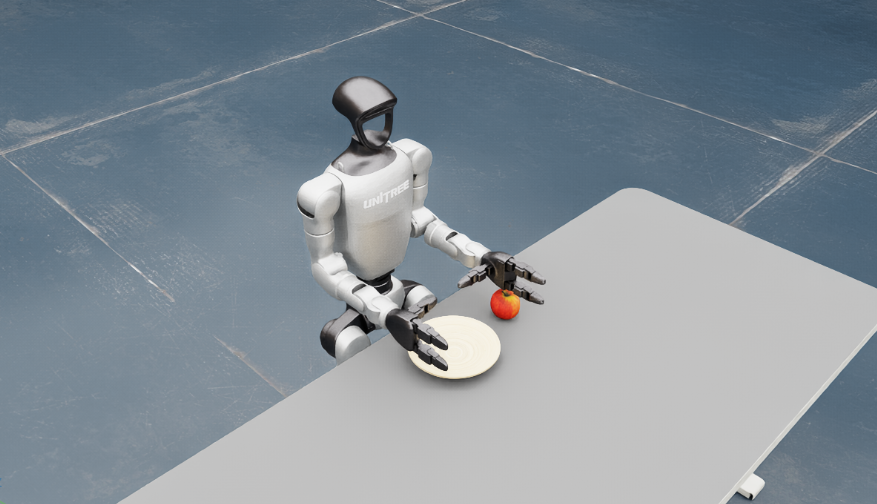
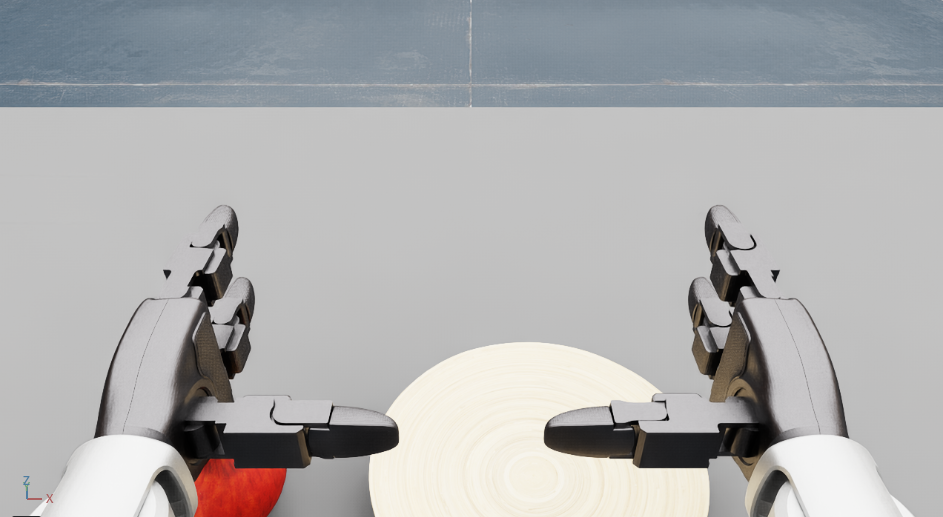
Use these views to check that the scene has loaded before starting your first take.
The training instruction is move the apple to the plate. Pick up the apple with one hand, carry it to the plate, and release it onto the plate. Keep the objects visible in the head camera and allow the apple to settle before starting another take.
A successful demonstration ends with the apple inside the plate’s placement footprint, touching the plate, released by both hands, and settled. Keep the apple and plate supported by the table. Holding the apple above the plate or leaving it on the rim does not count as success. Dropping the apple off the table, moving it too far from the plate, or knocking the plate off the table ends the episode as a failure. See Automatic Success and Failure Detection for detector criteria and follow-through behavior.
Which hand should I use?
Choose either the left or right hand to pick up the apple, then use that same hand in every episode used together for training, including episodes from separate recording sessions.
The launch commands below select the left hand with --manipulation-hand left.
Replace left with right in your chosen command to use the right hand.
If you omit this option, the default auto detects the pickup hand from the
saved episodes. Recordings containing episodes with different pickup hands
are rejected during finalization.
Choose a Recording Option#
Option |
Use It For |
Training Input |
|---|---|---|
Isaac Lab-Arena with Pink IK and AGILE (recommended) |
Record in the Arena scene used for evaluation |
Supports the supplied training configuration |
Native Isaac Lab AGILE |
Record in the built-in G1 static-apple scene |
Supports the supplied training configuration |
Pink IK turns hand-pose targets into upper-body joint commands. AGILE controls
the lower body. The Arena option uses g1_wbc_agile_pink; the native Isaac Lab
option also combines Pink IK with AGILE, in the built-in scene.
Both options support AutoData and save metadata describing the recording method, action layout, and manipulating hand. Later commands check that metadata. The Arena 50-D joint embodiment supports recording and replay but is not an AutoData source.
Use the explicit recording mode in the commands below. Without a mode selector, the launcher defaults to native fixed-base recording. That mode omits the navigation and base-height fields required by the supplied policy training and evaluation configuration. Fixed-base data needs custom training and evaluation integration.
XR Setup#
In the first terminal, start CloudXR:
uv run python -m isaacteleop.cloudxr
Accept the NVIDIA EULA when prompted. CloudXR writes its environment under
~/.cloudxr/run/. Keep this terminal running during recording.In a second terminal at the repository root, load the CloudXR environment and create the recording directory:
source ~/.cloudxr/run/cloudxr.env
mkdir -p outputs/g1
In that second terminal, launch one recording option.
Both commands below assume you will pick up the apple with your left hand. To use your right hand instead, change
--manipulation-hand leftto--manipulation-hand rightin your chosen command.To record in Isaac Lab-Arena with Pink IK and AGILE (recommended):
./tools/launch_recorder.sh \
  --recording-lane arena --arena_embodiment g1_wbc_agile_pink \
  --manipulation-hand left \
  --teleop_device handtracking \
  --device cuda:0 --viz kit --enable_cameras \
  --dataset_file outputs/g1/recording-arena.hdf5 \
  --num_demos 10
For native AGILE recording instead:
./tools/launch_recorder.sh \
  --recording-lane native --wbc-mode agile \
  --manipulation-hand left \
  --teleop_device handtracking \
  --device cuda:0 --viz kit --enable_cameras \
  --dataset_file outputs/g1/recording-native.hdf5 \
  --num_demos 10
Arena does not accept the native-only
--wbc-modeoption. To use handheld XR controllers, replacehandtrackingwithmotion_controllers.In Isaac Sim, select XR, then Start XR:
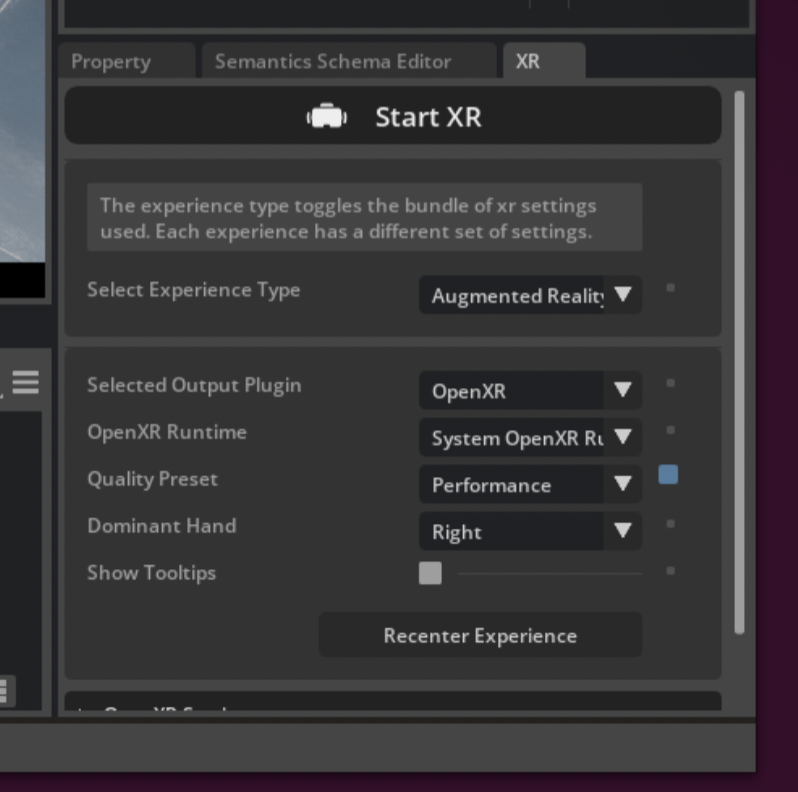
Select XR, then Start XR, before connecting the headset.#
Open the NVIDIA Isaac Capture web client on the headset. Enter the workstation IP, accept the certificate, and connect.
Select Play on the XR recording panel to start the first episode. Perform the apple-to-plate task. After each non-final successful take, wait for
Scene reset. Ready for the next take.before beginning again. Automatic resets do not require another Play press.
When using handheld XR controllers, their tracked positions and orientations set targets for the robot’s wrists. Their trigger, squeeze, and button inputs control the robot’s fingers. With AGILE enabled, their thumbsticks command walking, turning, and base height.
Recording Controls#
Session |
Input |
Result |
|---|---|---|
XR |
Play |
Start the first episode or resume after a manual finish |
XR |
Reset |
Finish the current episode, reset, and expose Play |
Keyboard |
M |
Save the current episode |
Keyboard |
R |
Skip the current episode and reset |
Keyboard |
P / O |
Pause / resume |
With automatic completion enabled, manually finishing an episode cannot force a success label. The default export mode keeps only successful episodes.
Output and Success Semantics#
After ten saved demonstrations, recording stops and the scene resets. The headset shows Recording complete and the saved count for five seconds, then the XR session ends and the recorder exits. Wait for dataset finalization to finish without errors. The terminal confirms:
Recording session completed with 10 saved demo(s).
It also prints Dataset target: with the output path. Keep that file for the
following stages: outputs/g1/recording-arena.hdf5 or
outputs/g1/recording-native.hdf5. Stop CloudXR with Ctrl+C in its terminal
when the recording session has ended.
--num_demos counts saved episodes. The default
--dataset_export_mode succeeded counts successes only. With
--dataset_export_mode all, saved failures also count toward the target.
The --enable_cameras option records robot_head_cam_rgb, which training
requires. If you omit --dataset_file, the recorder includes the recording method
in the filename under datasets/, such as
e2e_ra_dataset_native_YYYYMMDD_HHMMSS.hdf5. Replay and conversion read the method
from the embedded metadata, regardless of the filename.
Automatic Success and Failure Detection#
The static-apple task automatically labels each episode, records a short follow-through after success, saves it, and resets for the next take.
The static-apple policy:
Success uses the same criteria as checkpoint evaluation. The apple must be inside the plate’s placement footprint and height, at its resting height, released by both hands, in contact with the plate above the force threshold, and settled at or below the speed threshold. Both objects must remain supported by the table. An apple held above the plate registers no contact. An apple on the edge or rim is outside the footprint and can leave the episode running. Move it fully onto the plate or finish and reset the unsuccessful take.
Failure ends a recording episode if the apple drops off the table, moves too far from the plate, or the plate is knocked off the table. These geometric failure labels are specific to recording.
Follow-through — after success it records a few more frames before saving.
For non-XR sessions, begin the next take once the scene has reset. Those sessions do not print the XR readiness message.
--dataset_export_mode succeededis the default and keeps successes only.--dataset_export_mode allalso keeps labeled failures.--no-auto_successswitches G1 to operator-accepted episodes.--completion_override KEY=VALUEadjusts failure thresholds or follow-through, for example--completion_override far_distance_m=0.4.
Success thresholds remain shared with checkpoint evaluation. Implementation and scene-readability checks are described in the Developer Guide.
Replay a Recording#
Review the captured scene states without a headset. For the Arena recording:
./tools/launch_replay.sh --lane arena --replay-mode state --viz kit \
  --dataset_file outputs/g1/recording-arena.hdf5
For the native recording:
./tools/launch_replay.sh --lane native --replay-mode state --viz kit \
  --dataset_file outputs/g1/recording-native.hdf5
Confirm that the recorded hand carries the apple to the plate and releases it. State replay restores recorded robot and object poses. The default action replay instead applies commands through live physics and can diverge during contact. Native fixed or AGILE mode is read from the manifest.
Use
--select_episodes demo_0,demo_3to review a subset and--num_replays Nto repeat it. Episode names or zero-based indices are accepted.
Inspect a Recording#
Check the required state, action, and camera fields before conversion:
uv run --extra converter python scripts/convert_hdf5_to_lerobot.py \
  --inspect --strict --input outputs/g1/recording-arena.hdf5
For native AGILE, use
outputs/g1/recording-native.hdf5as the input. The command prints a JSON field report without writing a dataset.--strictfails if a required input or mapping is missing. It checks conversion requirements, not compatibility with the training configuration.
Next Stage#
Continue to G1 Dataset Conversion with your recording from either option above. To expand the demonstrations first, follow the optional G1 data generation stage.
Optional Recording Tools#
Randomize the Table Height#
After XR setup, a separate Arena session can vary the tabletop height per episode:
./tools/launch_recorder.sh \
  --recording-lane arena --arena_embodiment g1_wbc_agile_pink \
  --teleop_device motion_controllers --viz kit --enable_cameras \
  --table_height_offset_range_m -0.02 0.02 \
  --dataset_file outputs/g1/recording-arena-height-varied.hdf5 --num_demos 10
The table, apple, and plate move together by the sampled vertical offset.
The robot, floor, table geometry, and object XY distributions stay unchanged.
Equal bounds select one fixed offset; omitted bounds or 0 0 use the nominal
height. Success thresholds follow the realized height, which is stored for
replay. Random draws need not reach both bounds.
Note
The table is kinematic: its legs can float above or intersect the floor. Check the robot’s reach, posture, and recording success rate for the chosen height range. AutoData generation success rates at changed table heights have not yet been validated.
Merge Recording Sessions#
Important
The merger does not preserve the root workflow manifest. Its output cannot be used for workflow replay or AutoData. Keep the original manifested recordings for those stages. Do not use legacy migration to repair newly merged data. Ordinary G1 conversion can still accept the merged legacy-format output.
For conversion-only aggregation of compatible sessions:
uv run --extra converter scripts/merge_demos.py \
  -o outputs/g1/combined-for-conversion.hdf5 \
  datasets/session_a.hdf5 datasets/session_b.hdf5
The command checks format_version, per-key shapes, and dtypes, then renumbers
episodes. --dry_run checks inputs without writing. These structural checks do
not validate workflow-manifest compatibility. Use recordings from the same
robot model, robot-control software, camera, and task configuration.
Export a Recording to Video#
Render the head-camera stream without starting Isaac Sim:
uv run --extra converter scripts/hdf5_to_mp4.py \
  --input_file outputs/g1/recording-arena.hdf5 \
  --output_dir outputs/g1/videos
For native AGILE, substitute its recording path. The output contains one
demo_<id>_<camera>.mp4 per episode. Use --demo_id for one episode or
--input_keys for another camera.
Useful CLI Options#
Run uv run scripts/record_demos.py --help for recorder options. The command
calls the recording method a lane. Select Isaac Lab-Arena with
--recording-lane arena or native Isaac Lab with --recording-lane native.
--arena remains an alias for --recording-lane arena.
Developer smoke checks and robot-control software requirements are documented
in the Developer Guide.